
I love looking at blogs that have lots of pictures and tutorials, so that is what I am trying to do with my blog. Today I am going to attempt my first tutorial!! I have several projects that I am working on that I will be posting tutorials on soon, and I guess you have to start somewhere, right? So here we go!
My mom loves candles, (What woman doesn't?) and she has them all over her house. I love walking in her house when she has lots of them burning. It smells SO good! Especially during the winter, it always smells like Christmas!
I got off track!
So my mom had this big white, 3-wick candle that was kind of boring.

She asked me if there was anything she could do to make it a little more exciting. I decided to decoupage it!
I found these great napkins at a party store and knew they would work and look good in my mom's house!

Here's what you need:
Decoupage glue, sponge brush, and scissors.
A candle and napkins with a pretty design.

For this project, I used Collage-Pauge with a Matte finish.
Ok, the first thing you have to do is cut out the shapes you want to use.

The napkins are 3-ply, so you need to take the layers apart. You should take the bottom two layers off. You will only use the top layer. They will be very thin, so be careful!

A friendly tip about this part...Make sure you don't have a fan on as the very thin napkins like to fly all over the place! Also, if your children are wearing you out and you take a deep breath, don't let it out anywhere near the napkins....like I did...
...MANY times!
I kept having to pick them up off the floor!
I love my little monsters!
I like to lay out my shapes to make sure they will fit and that I like the way they are arranged. You can be exact and measure around the candle then measure the design but I don't do all that. I just lay them on the table in the order I want them in then I lay the candle down above the design and roll it. Start at the beginning of the design. Put your finger on the candle where the design will start. Then roll the candle to the right until your finger gets all the way back around to where it started.

I put the decoupage glue on the candle with my finger then carefully put the napkin on.

Put a little more glue on your finger and VERY gently smooth out the napkin. There will be wrinkles in it, so don't try to smooth it out all the way or you will rip it!
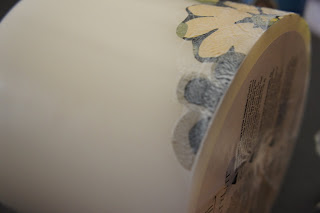
Once you have put the design on all the way around, or in the positions you want in it, then let it dry.

After letting it dry, apply one or two more coats of the decoupage glue over the entire design. You can now use the foam brush to apply it.

You now have a beautiful custom-decorated candle!

I really like the way this turned out!

Now go find some pretty napkins and start decorating some candles!

**On a big candle like this one, you can burn it with no problems, but if you do this to a tapered candle or a votive, the you shouldn't burn it. The paper will be so close to the flame that it will catch on fire. That wouldn't be fun!**


No comments:
Post a Comment